There are three Trumpet Fingering Charts here because we’re doing this on a “need to know” basis. The third one is where you’re headed but don’t start there if you’re a beginner. You should need the second one pretty soon if things go well. Start with the first one so you’ll understand what you’re doing. As your playing improves and you’re able to play more notes check back to this first chart. If symbols like F# and Bb mean nothing to you (that’s F Sharp and B flat) you might have a little Music Theory to catch up on.
Trumpet Fingerings for Beginner Trumpet Players
This is not a regular fingering chart like the one in your Band method book. It’s an explanation of how fingerings work on your Trumpet. Every note you play requires coordination of which valves are down and what is going on with your body. The coordination of those things happens in the ears and right between them – in your brain. This is one of the reasons that playing music is so good for you! In the old days trumpets had no valves and were limited to very few notes – like Bugle calls. A Bugle page will come along soon! The valves on your modern Trumpet add various lengths of tubing which make it possible for you to play a Trumpet of 7 different lengths. If you think I’ve miscounted you should know that the 3rd valve slide is the same length as 1st and 2nd combined.
First Notes For Beginning Trumpet Players
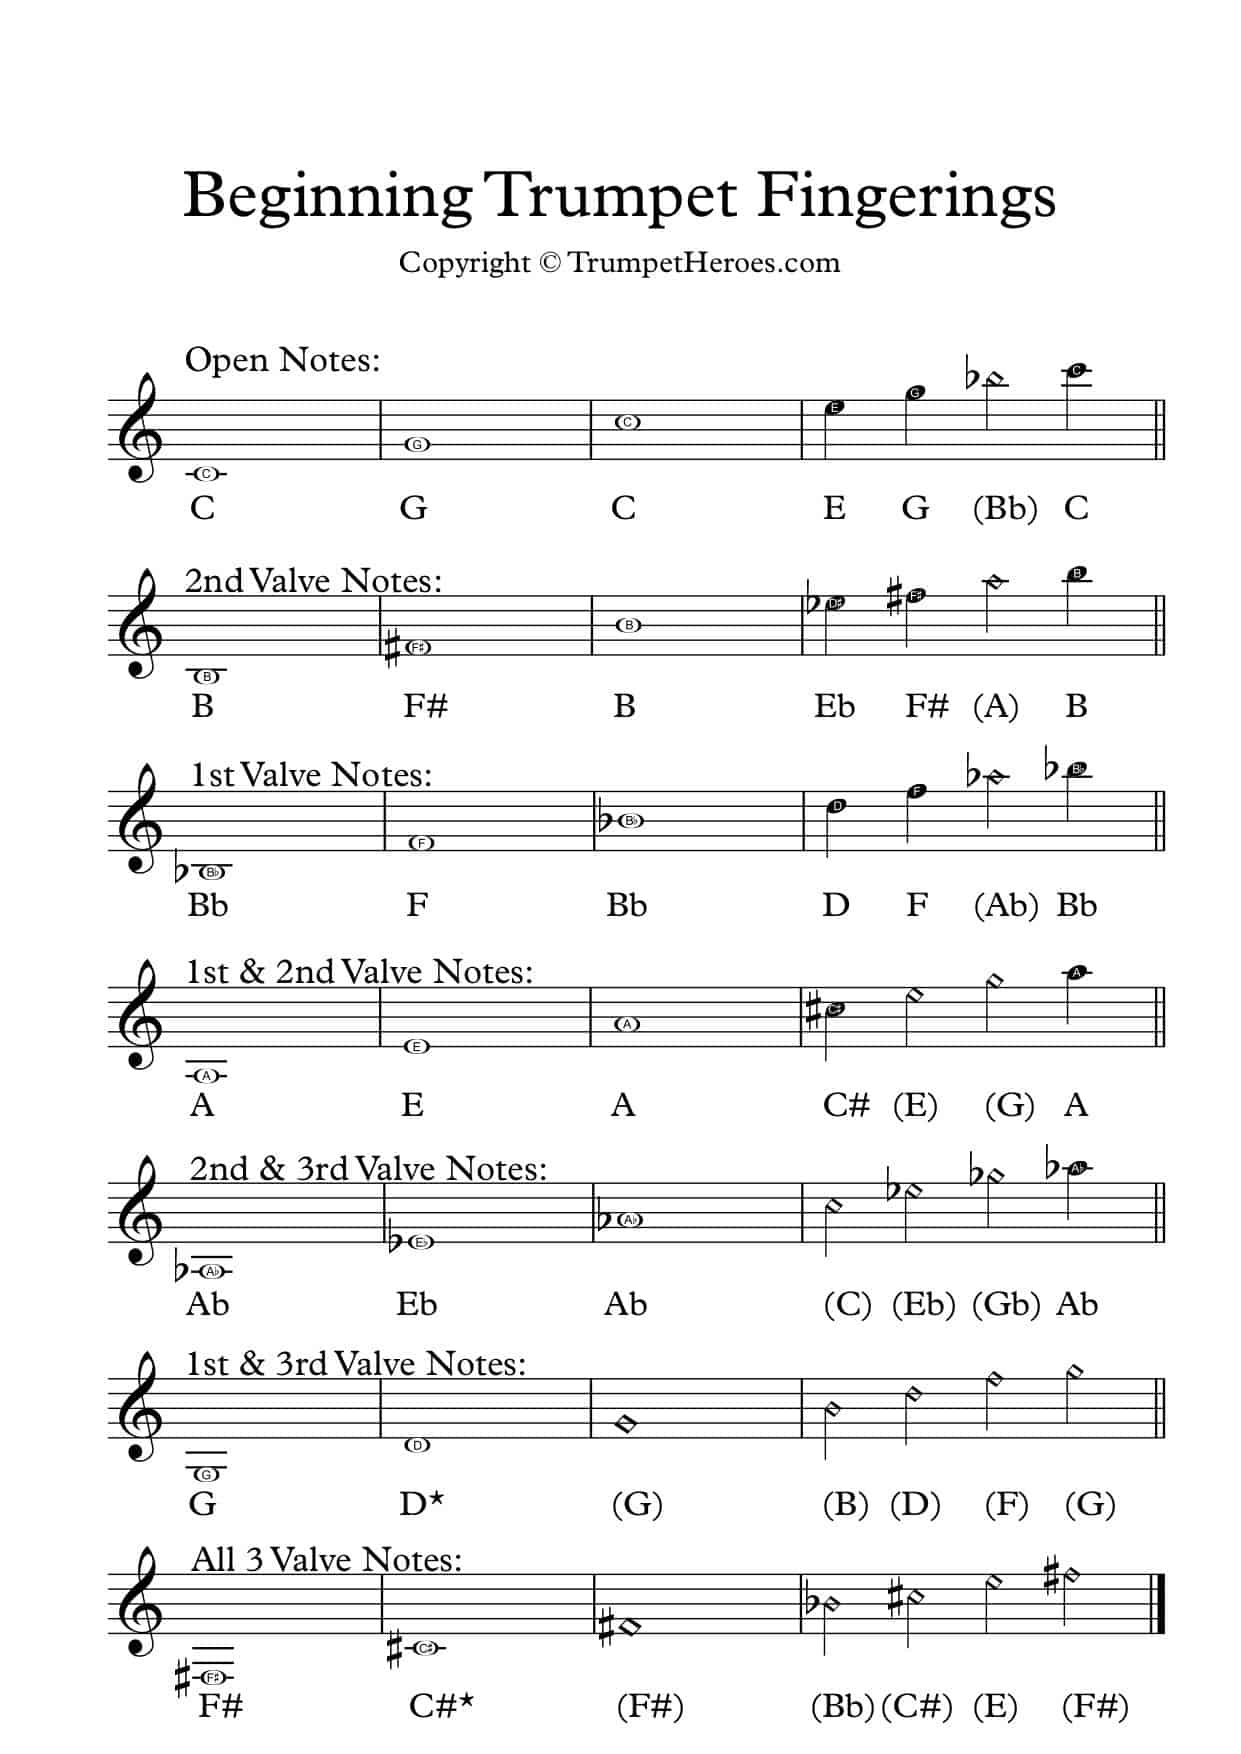
The first notes below are all played without pushing down any valves. Just look at the first 3 – the big ones. Chances are that you can only play one or two of them right now – that’s normal. Give them a try then move on. Don’t stop on the open notes and don’t bother with the higher notes yet.

Now use your Right middle finger and push down the second valve – the one in the middle. That makes a similar but slightly lower group of notes available. See if you can play one or two of those notes. There are more but let’s stick with these ones for now.

Now use your Right pointer finger only and push down the first valve – the one closest to your nose. Again you should find some slightly lower notes. You’ve been adding length to the instrument and the group of available notes has been adjusting downward.

Do the same thing with both of those valves down, then 2nd and 3rd, then 1st and 3rd and finally all 3.
Trumpet Notes and Fingerings
Lets get another thing straight right from the start. Learn to recognize these notes by their placement on the staff, by their names, by their sound and by what you do with your body to play them. That sounds like a lot but it isn’t. Start now, while you are only dealing with a few notes then you can expand your knowledge one note at at time. Don’t get in the habit of writing the fingerings in your music. Force yourself to learn them so that you just see the note, and know which valves to put down.
On this chart the whole (big) notes are the lowest and probably easiest to play. The quarter (smaller) notes are the higher ones that you’ll learn later and then there are the diamond-head notes. Those are on this chart because they exist on your Trumpet. Some of them are hopelessly out-of-tune and others can be useful in special circumstances. They are on the chart to help you figure out what is happening – for instance – when you think you’re playing a D with 1st and 3rd valves but it sounds too high. Chances are that you’re playing the G above that D unintentionally. That’s called mis-pitching and is rampant in the brass sections of beginning bands.
The Beginner’s Trumpet Fingering Chart:
Download the PDF Beginner’s Trumpet Fingering Chart
*** Notice the stars beside the low D and C#. Those notes will sound awful if all you do is push the correct valves down. To prevent those notes from sounding terrible (terribly sharp) you have to push out the 3rd valve slide. For now let’s say just make sure it’s out about 1/2 inch or 1.2 centimetres for low D and even more for C#. Once you’re making a good sound and getting around the instrument you can use a tuner and be more careful about how far out the slide should be, but it will be out. If your slide doesn’t work smoothly look at this page on Trumpet Lubricants. This is a deal-breaker and most band teachers have way too many other issues on the go to insist on it. I insist and so should you. Pass the word down the section – the fingerings for those notes aren’t right unless that slide is moved out. There’s a demonstration of why that matters in this video at the 3 minute mark.
Beginner Practice Tips
If you can practice with someone whose instrument generally plays right notes (like a clarinet) when they put the right fingers down they can help you figure this out. It’s possible to play all of the correct fingerings in a piece of music and not a single right note. That’s why we don’t write in fingerings. Without listening and thinking about how high or low a note is on the staff and in our bodies, our odds of playing any right notes aren’t very good.
As soon as you’re able to get more than one note, work on reliably telling the difference between them. If you use a piano, keyboard, flute, or string instrument to help you find the pitches remember that they have to play notes that are a whole step (2 semitones) below the ones you’re playing. Tenor sax and clarinet players play the same note names as you.
Trumpet Fingerings for New-ish Trumpet Players
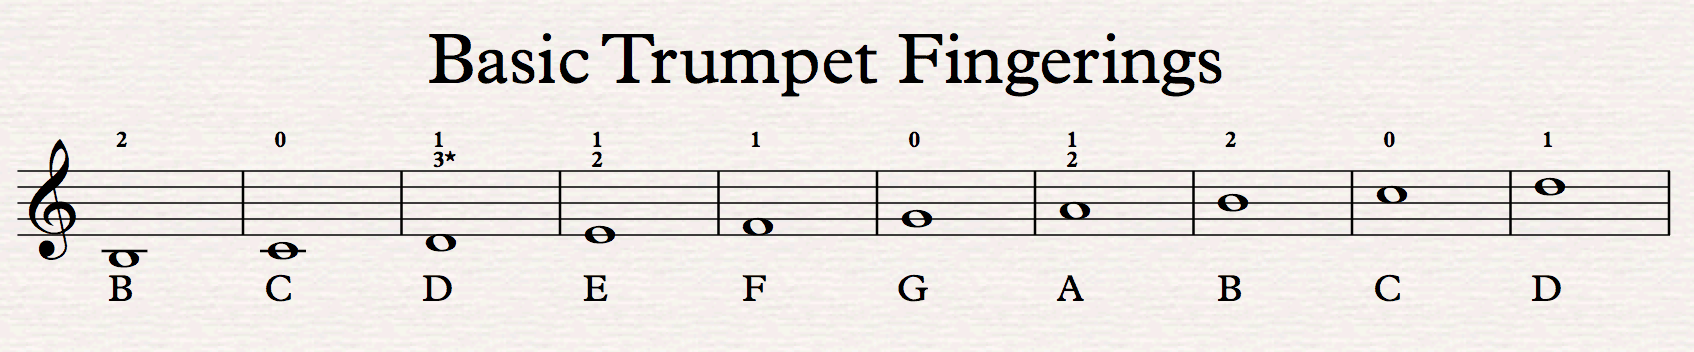
In most beginning band classes the notes below will get you through several months. If you’re in a cross-grade class with older players and harder music that uses other notes, get these notes right first. Let’s call these our Top Ten. These are the notes of our C scale with an extra one added on each end. If you’re in a band class those middle 8 notes are what your teacher might be calling the “B Flat Concert Scale” or “Concert B Flat Scale”. The mysterious confusion between what we call C and what they (band teachers, parents, and flute players) call B flat is explained in painful detail on another page.
When your music gets harder you’ll need more notes. At first you can cherry-pick from the serious chart below but eventually you’ll just want to move on.
*** If you didn’t read the paragraph about the 3rd valve slide (just up the page), you should. Either that or every low D you play will sound bad.
The Real Trumpet Fingering Chart
This standard trumpet fingering chart is presented as a chromatic scale. One of my regular exercises is to play it up and down trying to maintain a steady rhythm and good sound quality throughout.
Download the PDF Standard Trumpet Fingering Chart Below:

*** If you didn’t read the paragraph about the 3rd valve slide (up the page), you should. Either that or every low C# or D you play will sound bad.
Alternate Trumpet Fingerings
Alternate trumpet fingerings might be more of a discussion item than a chart. I’ll get to that soon but if you’re really interested go up to the beginners’ chart and play with them – they’re there with diamond heads.
Really High Trumpet Notes
The subject of really high notes and what fingerings to use is too big for this page. For now: if you’re playing well above the staff it’s probably best to use the fingerings from the octave below just so that you can keep track of where you are on the horn. If you find that your notes are out of tune you could start your alternate fingering search by trying the fingering for a whole step above the note you want. Beware, though … here be dragons.
Leave a Reply